The Dungeons of Ultima VII are far less complex than these of the predecessors. Nonetheless they have some hairy parts that are addressed here, together with complete maps, to make it easy to solve them.
Dungeons[]
Deceit[]
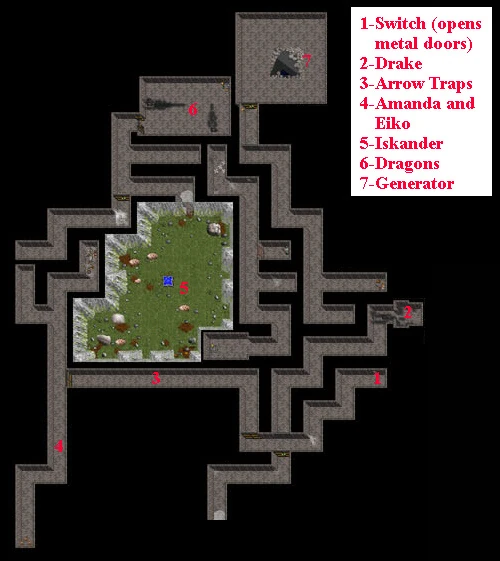
Map of Deceit in Ultima VII
The dungeon Deceit has to be entered after getting the enchanted Ether Ring from Penumbra in order to destroy the Tetrahedron Generator. While not a big dungeon, it is filled with traps, illusions and dead ends.
After entering the dungeon, move to 1 to flip the switch that opens the gate. You can also loot the Dragons at 2, but beware of Fire Fields. Then follow corridor 3. The many arrow traps can be mostly bypassed by fast moving along the northern wall. Going through the door will trigger hurtful lightning.
Talk to Amanda and Eiko at 4, before moving north through an illusionary wall in the northwest. If you want, battle the Dragons at 6 and take the loot. Go outside into the clearing and talk to Iskander at 5, who gives some hints.
Then follow the one corridor left through another illusionary wall, avoid the invisible caltrops and take the second eastern corridor, which leads through another fake wall (the southern room is a Poison Field trap). Move north through Energy Fields and Headless, before finally reaching the Tetrahedron Generator at 7. Use "Destroy Trap" to disarm the trap in front of the generator, put on the Ether Ring and enter the Generator to slay the Ether Monster. Use the prism and take it after the generator is destroyed.
Despise[]
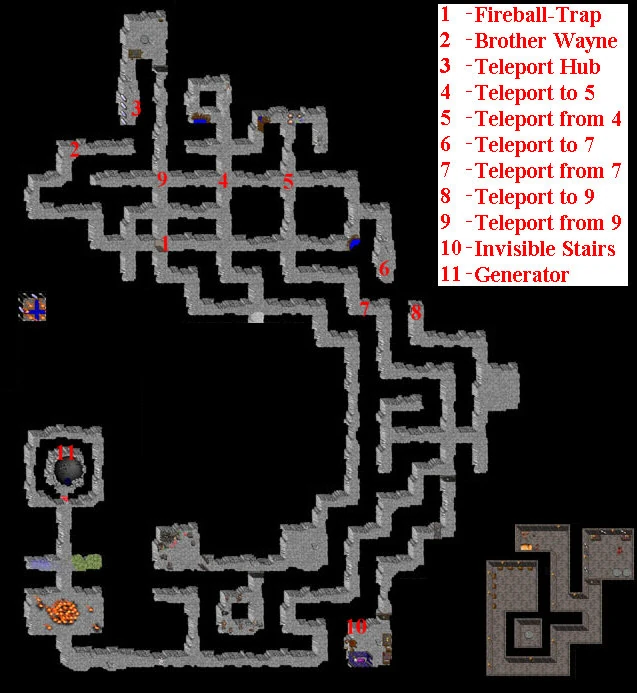
Map of Despise in Ultima VII
(Note that this dungeon actually is Shame, but an error during production accidently swapped it with Despise)
The dungeon Despise has to be entered in order to destroy the Sphere Generator after talking with the Time Lord. It is a complicated maze with many traps, teleporters and nasties.
After entering, first go north-west and disarm the fireball-trap at 1 with "Destroy Trap". Then talk with Brother Wayne at 2 to help him out of his situation. Then move to 4 to teleport to 5. Then go to 6 to teleport to 7. Follow the corridor south and ignore the door for now. After some opposition you'll walk through a room with many fields, before reaching the generator at 11. Try to reach it, then use "Mark" for a teleport point, for later.
Return to the door, open it and kill the mage. Loot the room then ascend the invisible stairs at 10 into Selvyn's hideout. Kill him and his co-conspirators, then loot the room and the corpses. Save and experiment with the teleporters to get to their storeroom (others teleport you out) and loot this one as well.
Return after getting the enchanted Hourglass of Nicodemus to enter the Sphere Generator. Follow the color sheme of the flashing spheres and use the prism to destroy the generator. Take the prism with you.
Destard[]
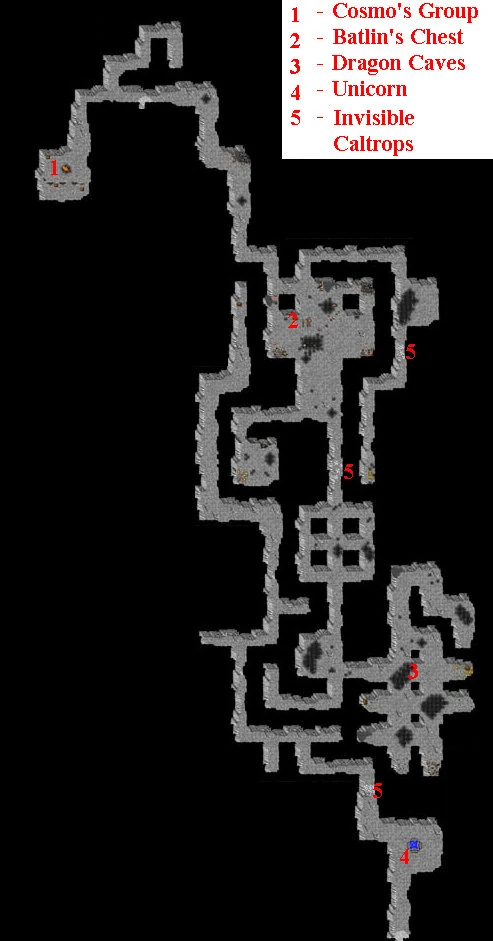
Map of Destard in Ultima VII
The main objective in dungeon Destard is, to find a Fellowship chest after Batlin instructed you to do so as the second Fellowship quest. The dungeon is less about exploring and more about pure survival.
After using the north entrance, go west and talk with Kallibrus, Cairbre and Cosmo to learn of their quest. Then go east and enter the Dragon Caves. There isn't much tactic, brute force is needed and the Dragons are hard enemies. You find the chest at 3, but it has been looted (look into it). Now search through entire cave for loot while avoiding the caltrops at 5. After this is done, leave to reach the southern entrance.
Once inside, talk to Lasher the Unicorn before looting this side of the dungeon as well. The fountain found there grants Protection. Afterwards return to Britain and report Batlin that there are monsters in the dungeon.
Wrong[]

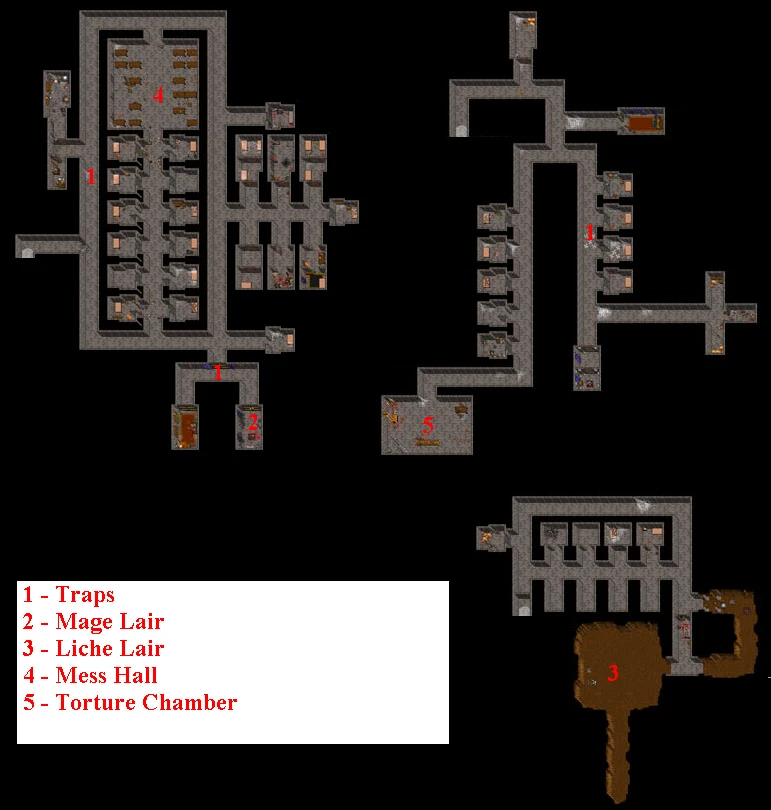
Map of Wrong in Ultima VII
Dungeon Wrong has no story relevance. It however has some nice loot, which is guarded by a number of various nasties.
There is little tactic involved in looting all three levels of this dungeon, however, be careful of the traps at 1, which are mostly invisible caltrops, but also some fire fields, which drain health rather fast. The mess hall at 4 usually is filled with various nasties.
Special points are the dark mage at 2, who has lots of reagents (sometimes a Liche is present), and the Liche at 3, who is in possession of a Magic Sword. The torture chamber at 5 has nothing of actual interest in it and is purely for amusement.
Covetous[]

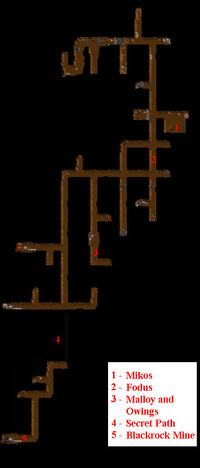
Map of Covetous in Ultima VII
Dungeon Covetous has no story relevance. It however is useful for mining Blackrock and has some interesting characters in it. It is next to completely monster-free.
After entering through the northern entrance, massacre the Trolls living there, before moving first east, then south. Speak with Mikos at 1, before looting the storage shed. Move further south and you find the sickly Fodus, who tells of the Blackrock (you can ask Mikos about his claims as well). At 3 you find Malloy and Owings for some comic relief.
At the southernmost part of the mine, got through the secret corridor at 4 to find the Blackrock mine. With it, you have an unlimited supply of the material.
Shame[]
(Note that this dungeon actually is Despise, but an error during production accidently swapped it with Shame)

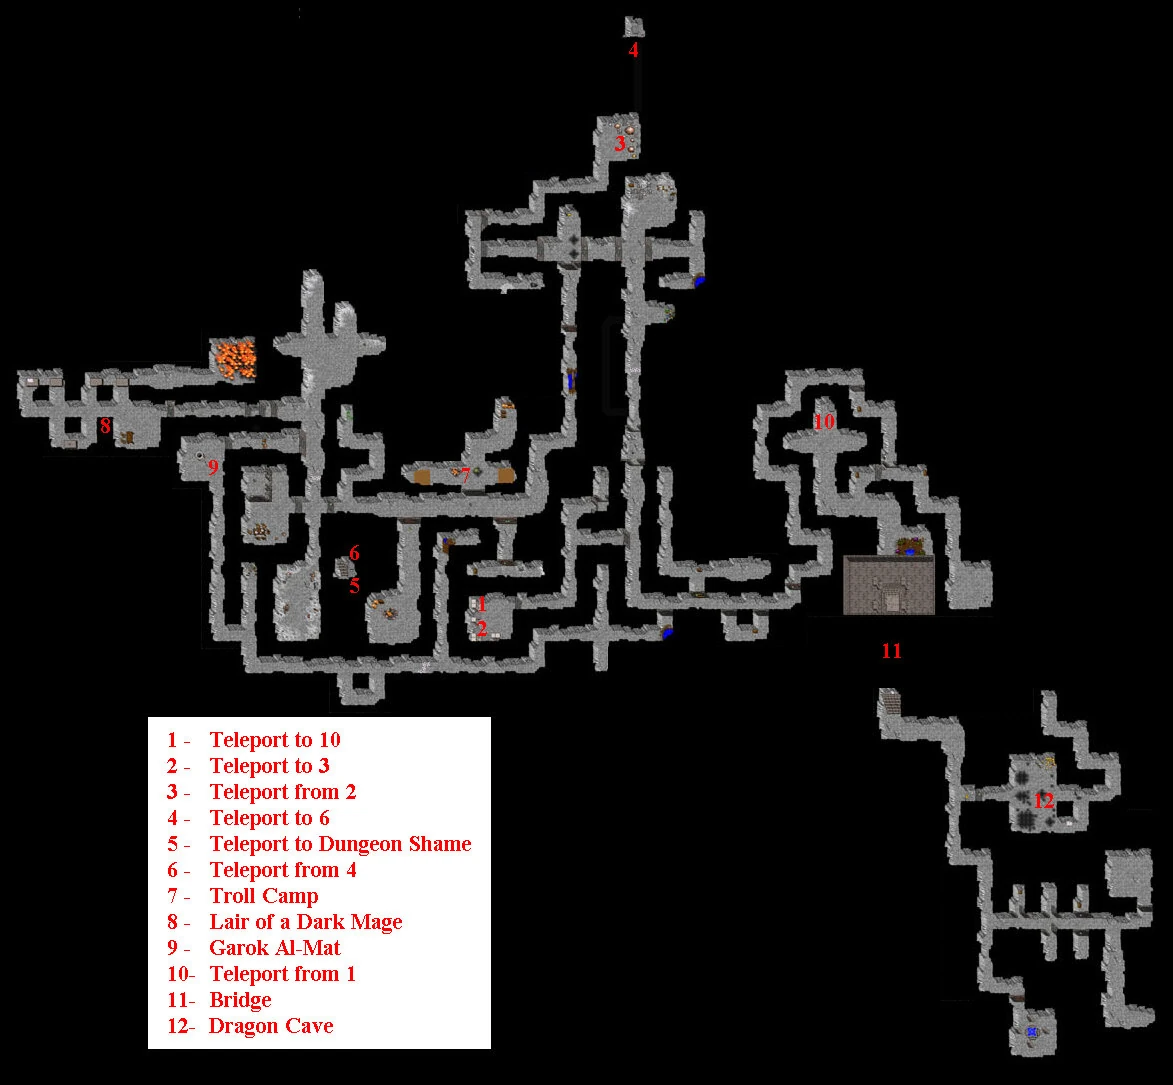
Map of Shame in Ultima VII
The dungeon Shame has no story relevance. It however has some nice loot. This dungeon has lots of keys that you should automatically get when looting the rooms, and is structured like a labyrinth.
After entering the dungeon, take the key, then proceed to open the doors until you reach the fireball-trap, after deactivating it with the switch ("Telekinesis" helps), move south. Loot all of the following caves and beat up the Trolls, until you again have to open doors, to enter the lair of the dark mage at 8. After killing him and looting the room, return to the fireball-trap.
Now open the doors to the east, then move south and avoid the teleport trap by finding a secret passage along the left side of the corridor. Walk past the teleporter room and go through the southern door. Follow the long corridor until you meet Garok Al-Mat at 9. Help him escape, and he gives reagents.
Now backtrack to the door and walk east. Follow the corridor until you reach the well-build room and walk over the bridge at 11 into the dragon's nest, where you loot everything. The Fountain has healing powrs. Backtrack and move to the teleporter marked 2 which brings you to 3. First use the key you find to unlock the door to the entrance, then follow the secret passage north to reach the teleporter at at 4 which brings you to 6. Go up the stairs and take the magical weapon, before taking the teleporter 5 to leave for the dungeon Despise, or just leave the dungeon.
Hythloth[]

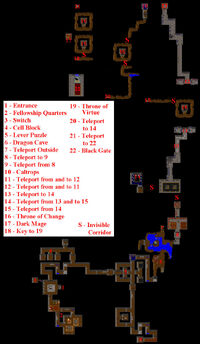
Map of Hythloth in Ultima VII
Hythloth is the final destination of Ultima VII (although the game doesn't refer to it by name), the path to the Black Gate of the Guardian. A very complicated maze with countless traps and puzzles.
After opening the entrance door at 1, walk south from the throne room and loot the Fellowship quarters at 2. Then return to the throne and walk through the curtain to flip the switch at 3. Now go north to the prison at 4. Play with the switch until you've gotten the key and pulled a hidden lever for a secret exit. Follow the corridor east, solve the wall puzzle at 5 and walk north until you reach the dragon cave at 6 with said Dragons and some nice armour.
Avoid the mirror at 7 and the teleporter at 8 , as they are both traps. Enter the Fellowship hall, lift the medallion and let it go to open the northern door. Go through the northern secret corridor. While it is possible to take the northern route, it is easier to walk through the eastern illusionary wall and follow the invisible path until reaching the teleporter 14, which will lead to 15. Walk through another fake wall to reach the Throne of Changes at 16.
Sit on it and wait to get teleported. Go through the southern fake wall and get the key from the body. Go through the north-western fake wall to kill the mage and loot his place. Then sit on the throne again to get teleported. Go through the northern fake wall, kill the Liche and sit on the Throne of Virtue at 19, enabling teleport location number 4. Then sit on the Throne of Changes again to teleport.
Kill another Liche to enter the teleporter at 21 which will take you to the Black Gate at 22. Now concentrate on killing Hook first, as it will cause Batlin to flee, then kill the others. Place the three Prisms on the transmitters to de-activate the beam and use Rudyom's Wand to destroy the Black Gate.
Caves[]
Note that very small caves are not included here.
Bee Cave[]

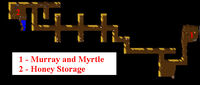
Bee Cave Map
The main objective in the Bee Cave is to find honey with which it is possible to befriend the Emps.
After entering the cave, you'll find Murray and Myrtle in the north-east at 1. They'll act like primitives until you've talked with Tseramed about them, then they'll tell their story. Walking west past many Giant Bees, is the honey storage at 2, which is what you are there for.
Buccaneer's Cave[]

Buccaneer's Cave Map
It is needed to enter the Buccaneer's Cave in order to get the key to enter the dungeon Hythloth.
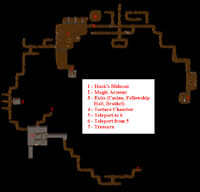
The three entrances at 3 are the House of Games, the Fellowship hall and the House of Baths. Normal entry is the House of Games. Enter Hook's hideout at 1 and take the key to Hythloth. You can also read his hit list. Afterwards go east to get a Magic Armour at 2, then backtrack.
This time go west, through an illusionary wall, then north, until you reach the torture chamber at 4. Talk with everyone, then kill Grod to free the prisoners. The trap at 5 will teleport to 6. Kill the beast, then walk east through a fake wall until you reach 7 for more treasure.
Now backtrack and avoid the teleporter, to exit through the House of Baths, getting more loot in the process.
Cyclops Cave[]
Cyclops Cave Map
It is not needed to enter the Cyclops Cave. However, the Cyclops have some nice loot and give good experience.
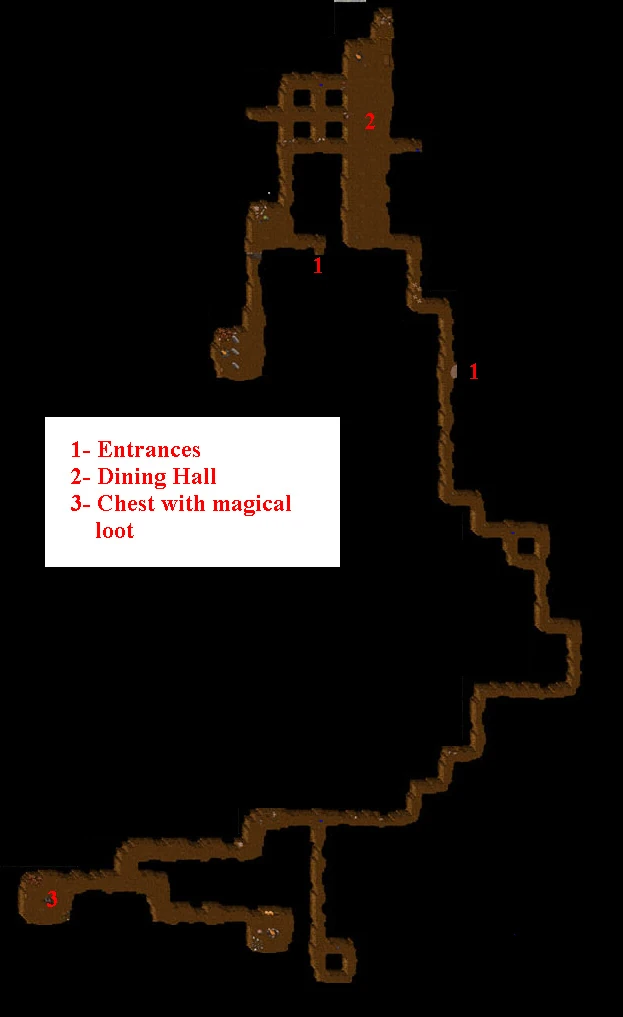
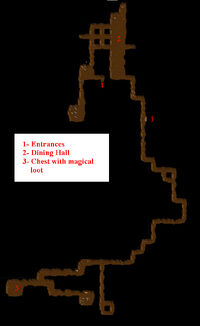
The cave, when looking at the entrances at 1 also acts as a shortcut to Minoc, if one doesn't want to go through the swamp. A lot of resistance can be expected in the dining hall at 2, with often a dozen Cyclopses walking around there. The main goal however is a chest in the south-western part of the cave at 3, which contains magical loot.
Desert Dungeon[]

Desert Dungeon Map
Entering the Desert Dungeon is entirely optional. However, it does have some nice loot.
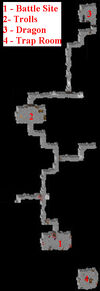
First off, go north and enter the big hall at 2. where you are confronted with some Trolls, after killing and looting them, go further north through an illusionary wall until you reach a Dragon. Kill it, and loot the place, before backtracking your steps.
Now from your starting location go south to 1. Loot the entire battle site (lots of good armour), before looking for the hidden teleport that teleports to the cave 4. Read the last words of the unlucky Denyel. To escape, you can either use the Orb of the Moons or cast "Help" (the Orb is better).
Spirit Tunnels[]
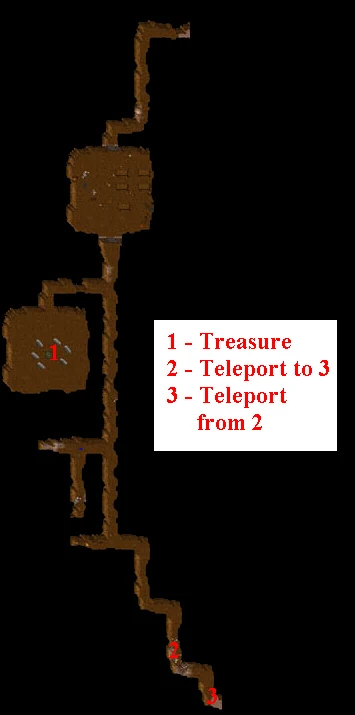

Spirit Tunnels Map
There is nothing of story relevance in the Spirit Tunnels, only loot.
You can only enter the caves from the north. Move south until you reach 1, where, after getting rid of the foes, you can get a Great Dagger from the altar. Moving further south, you'll encounter at 2 the reason why you can only enter the caves from the north. A teleporter that teleports you to 3, the southern entrance.