Editable Codex
Advertisement
Despise Entrance U4

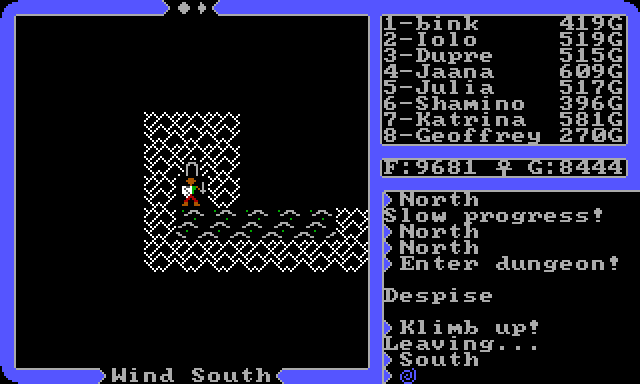
Entrance to Despise, Ultima IV

The Anti-Compassion Dungeon of Despise was first entered in Ultima IV. Deep in its depths the Stranger found the Altar of Love and the Yellow Stone.

Healing FountainExitU4-Despise-L1-Room-0Poison FountainWind TrapU4-Despise-L1-Room-1U4-Despise-L2Despise Level 1
About this image

Despise Level 1 - Click locations on the map for more details

U4-Despise-L3U4-Despise-L2-Room-2U4-Despise-L2-Room-3U4-Despise-L1Despise Level 2
About this image

Despise Level 2 - Click locations on the map for more details

Secret DoorU4-Despise-L4U4-Despise-L4U4-Despise-L2Poison FieldU4-Despise-L4U4-Despise-L4Despise Level 3
About this image

Despise Level 3 - Click locations on the map for more details

Plain FountainPlain FountainU4-Despise-L3U4-Despise-L5U4-Despise-L3U4-Despise-L4-Room-4U4-Despise-L3Magic OrbsU4-Despise-L5U4-Despise-L3Despise Level 4
About this image

Despise Level 4 - Click locations on the map for more details

Lightning FieldPit TrapU4-Despise-L5-Room-5U4-Despise-L6U4-Despise-L4Yellow StoneU4-Despise-L5-Room-6U4-Despise-L5-Room-7Pit TrapLightning FieldPoison FieldWind TrapWind TrapWind TrapWind TrapSecret DoorU4-Despise-L6U4-Despise-L4Despise Level 5
About this image

Despise Level 5 - Click locations on the map for more details

U4-Despise-L7U4-Despise-L5Healing FountainU4-Despise-L5U4-Despise-L6-Room-8Despise Level 6
About this image

Despise Level 6 - Click locations on the map for more details

U4-Despise-L8Secret DoorU4-Despise-L6Despise Level 7
About this image

Despise Level 7 - Click locations on the map for more details

Magic OrbsU4-Despise-L8-Room-12U4-Despise-L8-Room-9U4-Despise-L7Lightning FieldAltar of LoveU4-Despise-L8-Room-14Magic OrbsMagic OrbsU4-Despise-L8-Room-13U4-Despise-L8-Room-10U4-Despise-L8-Room-11Despise Level 8
About this image

Despise Level 8 - Click locations on the map for more details


Walkthrough[]

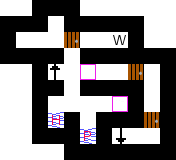
The dungeon Despise can be a little confusing. The most difficult task is getting the Orbs on level 8, with one on level 4. The Yellow Stone in found on level 5.

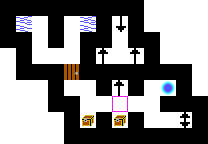
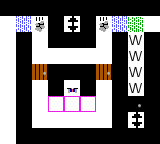
On level 1, go east through the room with the headless and mimics to reach the ladder going down. On level 2, follow the path and exit the first room to the north or south, the second to the west to reach the ladder to level 3. On level 3, dispel the field and take the southern ladder. Exit the dungeon room on level 4 to the east, take the Orb, then descend.

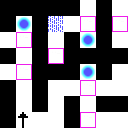
On level 5, walk north through the secret door and the winds, dispel the fields and then go south until you reach the three-room configuration. Enter the middle room, kill the monsters and enter the TWO secret doors to go north and take the Yellow Stone.

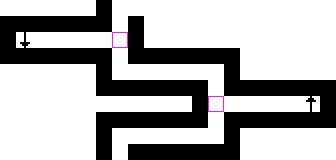
Now backtrack to level 3 and take a different ladder down. Follow the ladders until you reach level 7. Go through the northern secret door and descend to level 8. Take the northern Orb first, then navigate through the rooms to get the other two.

Advertisement